
Ask a New Yorker if they’ve ever visited the Statue of Liberty and you might be surprised to hear that they haven’t. But surely all ‘Old’ Yorkers have made the most of their city’s iconic heritage and walked the entirety of the medieval walls, right? If you never have, come on – let’s walk the city walls!
For best results, open this page on your smartphone and, while you’re walking, refer to the instructions and tasty historical titbits. The map will help you find your way.
We start our walk at Baile Hill (1) by Skeldergate Bridge, although you can pick up the trail anywhere – it all loops around (unlike that frankly inferior wall in China). But first, have some facts:
-
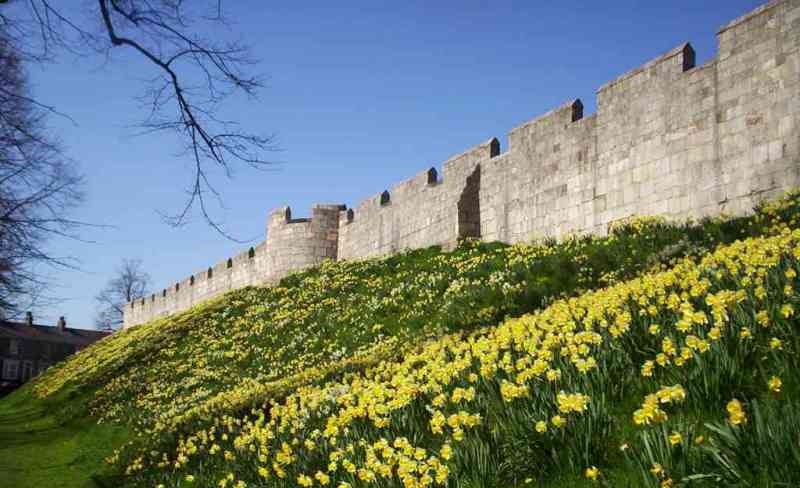
Our city walls are the most complete example of medieval walls in the country.
-
Much of the earth ramparts on which the medieval walls were built were put there by the Vikings to strengthen the original Roman walls.
-
‘Bar’ comes from the old French ‘barre’, meaning to stop. As in, ‘your barred, mate. Get out!’
-
In 1800 the City Corporation applied for an Act of Parliament to have the entire walls demolished. The likes of artist William Etty fought to have them restored. York’s walls remained, countless other cities’ didn’t. Ha, suck it, London!
-
The walls are a Scheduled Ancient Monument and a Grade 1 listed building. All of them. Wow.
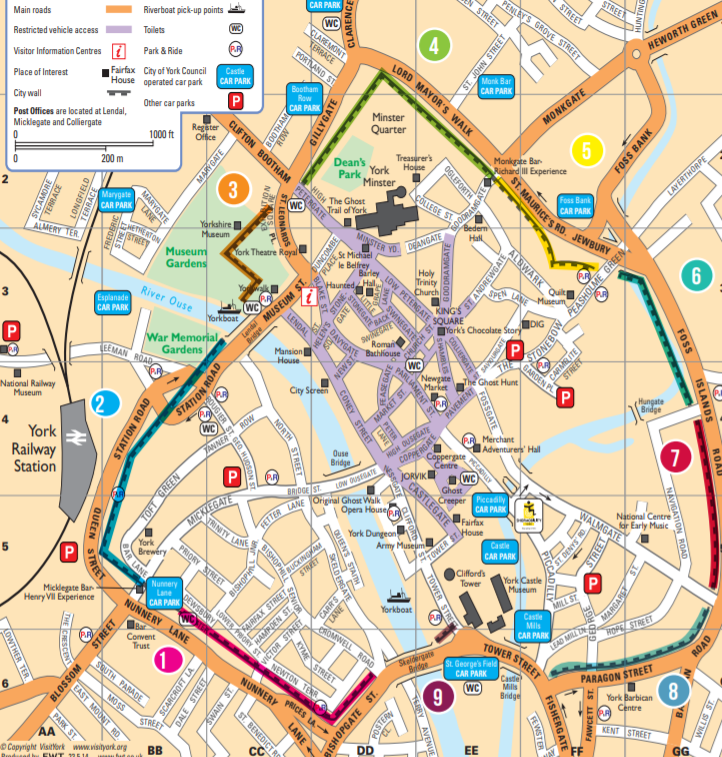
1, Baille Hill to Micklegate Bar
-
Head up the steps in the small tower. This little tower is actually fairly recent, being built in 1878 following the demolition of part of the wall which once ran all the way to the river’s edge.
-
The big lump of earth at the top of the steps once had a castle on top just like Clifford’s Tower, but made of wood (we wrote about it in the Time Travel feature in the August ’15 issue).
-
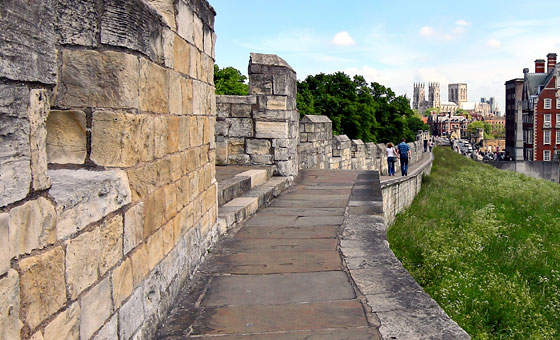
The walls in this section are fairly straight and were mostly constructed between 1317-40. Some mason marks have been found in the stones, matching those found in parts of York Minster. However, the entire stretch of walls here sits on Roman foundations.
-
The tower as the walls turn the corner toward Mickelgate Bar is called Bitchdaughter Tower. Seriously.
2, Micklegate Bar to Barker Tower
-
Micklegate Bar is one of the four major gateways into the city, and the only one the ruling monarch can officially enter by. The bar was first mentioned in the 1150s and boasts reused Roman sarcophagi in some of the stonework.
-
Head on, and you’re now walking on the section of the walls highest from the ground.
-
The corner tower, Tofts Tower, was destroyed in 1644 and rebuilt in it’s present shape to accommodate a cannon (with guard room below).
-
Heading towards the city centre, you might notice the two huge arches in the wall below you. These once admitted trains into the old station, which now houses City of York Council.
-
Head on, and as the walls drop down toward the road you’ll see one of the most famous views of York with the Minster towering above the roofs.
-
You’ll cross two more archways on this section of the walls. These were broken through in 1874 and 1876 to allow access to the new, and current, station.
-
At the end of this section of the walls you’ll find Barker Tower. In medieval times a huge chain ran from this tower to Lendal Tower across the water, to keep out invaders (but more importantly non-toll paying ships).
3, Lendal Tower to Bootham Bar
-
Bit of a weird section this, as you can’t actually walk on the walls! Cross the river and you’ll be met by the imposing form of Lendal Tower. One time chain tower (along with Barker tower), this structure also used to house a huge pump which supplied the city with water.
-
Behind the tower you can see the length of walls running along Museum Street, but unfortunately these have never been made safe enough to walk on.
-
Enter the Museum Gardens. You can see that the walls take a 90 degree turn here, and in fact these sit on the original Roman fortress walls. In fact, the whole next section is sitting right on top of those nice and straight Roman defences.
-
The famous Multiangular tower, where the walls turn once more, was the western tower of the Roman fortress, with added 13th century masonry on top. Pop in though the small doorway to see arranged Roman coffins!
-
From this point you can follow the walls running north-east. On the site of the little lane that you’re walking along there were once another set of walls to mark the boundary of St. Mary’s Abbey. This means the grassy ramparts of the city walls were a kind of no-man’s land.
-
As you exit the lane on Exhibition Square, you’ll see your next port of call – Bootham Bar over the road!
4, Bootham Bar to Monk Bar
-
Head up the steps into Bootham Bar. This gateway sits on the site of the Roman porta principalis dextra (the right-side gateway) and features an outer archway dating from the 11th century.
-
Head through the doorway and back outside onto the walls. Yay! This section was heavily restored during the 19th and 20th centuries and again follows the exact line of the Roman wall (in fact, they are built directly on top of them!).
-
The structure as the walls turn another right angle (those Romans loved straight lines, eh?) is called Robin Hood Tower. A great place to sit for a rest, the building is actually only a hundred years old, replacing a much older structure. Turn around and check out those views of the Minster.
-
As you continue on the way you can look to the left to see the one-time city moat running along Lord Mayor’s Walk, and to the right to likes of the Dean’s Residence and Gray’s Court.
-
As you approach Monk Bar see if you can notice a dip in the ramparts below – this marks the spot of the Roman porta decumana, the gateway that led directly out of the fortress’s principia headquarters.
5, Monk Bar to Layerthorpe Postern
-
Built in the 14th century to replace the older Roman gateway, Monk Bar, the tallest of the city’s four main bars, takes it’s name from the monks of the pre-conquest Minster. Either pop in to visit the Richard III museum, or descend the steps to street level to continue the walk.
-
Cross Goodramgate and climb the steps to get back on the wall. As you walk along take a peek over the battlements to the left – you’ll see a Victorian ice house.
-
Further along to the right you’ll see the remains of the Roman eastern corner tower. Exposed in 1875, this tower would have been the opposing counterpart to the Multiangular tower, meaning you’ve just walked half of the Roman fortress’s diameter. From this point on the walls are entirely medieval.
-
The small semi-circular tower you pass by is called Harlot Hill Tower. Another brilliant name – thanks history.
-
As the wall walk veers to the left, you’ll see St Cuthbert’s Church to the right and then descend to Layerthorpe Postern.
-
The small tower and archway is all that remains of what would have been quite an impressive gateway, serving to control traffic along the Foss and into the city along Layerthorpe Road. This section of the walls has been steadily chipped away to make way for the wide Peasholme Green, and the old Layerthorpe bridge, versions of which date back to the 13th century, and which was completely removed in the 1990s. Now it just looks like a big road. Nice.
6, Layerthorpe Postern to The Red Tower
-
No, the walls haven’t been knocked down by 20th century morons along this section – there never actually has been any along this stretch. That is because William the Conqueror had the Foss dammed by the castle, causing the river to flood upstream – right here.
-
Walk along Foss Islands Road and imagine the whole place water-logged (with occasional muddy islands – hence the name) and continue onto The Red Tower. Sounds like something from Game of Thrones.
7, The Red Tower to Walmgate Bar
-
The Red Tower was first mentioned in 1511 and is uniquely built of red brick. In 1490, possibly when the tower was being built, there is a record of builders complaining that tools had been stolen from the tower. Many believe this was done by the city stone masons, angry that they hadn’t been employed to build it!
-
Rounding the tower, head up the steps back onto the walls. This section has no earthen ramparts as the ground was extremely marshy around here.
-
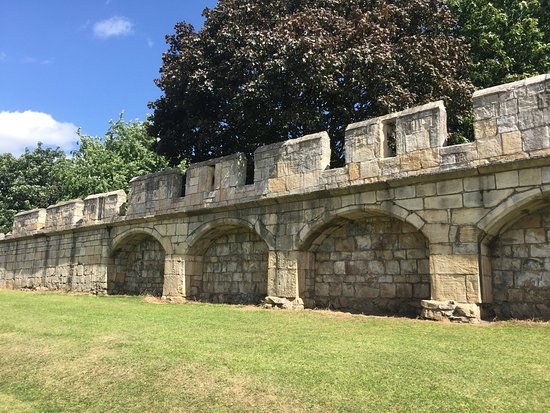
Soon the walls raise in height and are built on strange-looking archways. This too was to protect the structures from the waterlogged ground.
-
If this section of the wall seems quite clean and unworn, its because much of the stonework was heavily restored in the 19th century, saving the entire part from crumbling.
8, Walmgate Bar to Fishergate Postern
-
Walmgate Bar is the only gateway to retain it’s barbican; a structure that acted like an airlock or double gateway. The main stone archway dates back to the 12th century, while the rest of the structure was built in the 14th. However, the timber building on the inside face dates from the 15th century, and has in the past served as a private residence. These days it’s a lovely coffee house.
-
Descend, cross the road, and head back up onto the wall. Along this section you might notice musket-loops in the battlements, installed during the Civil War when Walmgate Bar took a pounding from the Roundhead cannon on Lamel Hill (covered in Time Travel, November ’15).
-
You’ll have to drop back down to earth to get around Fishergate Postern. This small gateway has actually spent much of it’s history bricked up. It was closed following a revolt in 1489 and not opened again until 1827. Pass under the archway and you might see signs of burning on the stonework from the revolt.
-
Back up onto the walls and continue walking. This section of the walls were completed in 1345 by Thomas de Staunton – we know this because the contract for the work is the only surviving example in the city.
-
Round the corner, looking over the edge of the tower to see how the road has cut away a section of the ramparts, and continue to the (almost) final tower, Fishergate Postern.
-
The postern tower was constructed in 1501, replacing an existing smaller structure, Talken Tower. Originally it had a flat roof with crenellated battlements, and served, just like Layerthorpe Postern, to control traffic into the city along the river Foss.
9, The Castle to Davy Tower
-
Not really a section that many people remember to include, but the curtain wall of the castle, still visible today as you cross the bridge over the Foss, was very much part of the city’s defences – especially if you were the monarch or the lords in the castle! Carefully cross the road over Tower Street and head for the entrance to Tower Gardens.
-
Ah-ha! Walls! Yes, a bit of a hidden section, and unfortunately not one big enough to accommodate walkers, this length ran from the old castle walls which ran along Tower Street, down to the river. The walls also mark the limits of the Franciscan Friary which existed beyond them.
-
Note the river height marks, showing just how high the river has flooded over the years.
-
At the end, down by the river, are the remains of Davy Tower. Just like best mates Lendal and Barker Towers, a chain was slung across the river at this point to meet up with Skeldergate Postern (now demolished).


Add a comment